Carving aircraft propellers
Saturday, 14th May, 2011
If scratch building model aircraft has taught me anything, it is that one of the biggest obstacles to achievement is temerity and self-doubt. Time and again I have found that jobs I had regarded as beyond me were not only doable with thought and perseverance, but also highly enjoyable, leaving a sense of achievement all the greater for having surmounted difficulties.
Carving propellers is probably a bete noir of most model makers who try building from scratch. It certainly was mine, until I was forced to give it a go, simply because there was no alternative. Yet despite my misgivings, my first tentative attempt yielded an acceptable result, and my handiwork has improved, more or less, with each successive attempt. Yet I do not presume to be an expert. What I describe here is a technique by which I was able to achieve a result that, in my eyes at least, passes muster. I am not pretending to replicate in miniature every nuance of airscrew design, but I think I have been able to capture the look and feel of the original tolerably well, albeit with subtle omissions and less subtle mistakes.
Accurate drawings are always the starting point. The superb journal WWI Aero is a perennially reliable source, and Ray Rimmel of Windsock Publications has an excellent little monograph specifically on WW1 propellers, with a number a fine drawings and pictures. Good photographs are invaluable and I always try to take my own from an extant original for every model I build.
The second prerequisite is suitable material. In my book, wood grain and carving qualities are more important than colour because there’s always the option to use stain to dress up the hue. The grain needs to be straight and close and the wood neither too hard nor too soft. I’m still using a supply I obtained by breaking up an old trinket box in which my grandfather kept his lathe tools. The tar-black surface is ancient and pickled with oils and cutting fluid, but beneath it, if one can work around the patches of woodworm, it is the stuff of heaven, browner than mahogany but smooth and finer grained, and it carves like a dream. Some day I must find out what it is!
I start by thicknessing my material as given by the drawing in side view. Then I mark the front-on outline of the blades. My technique is to cut paper patterns direct from scale-size copies of the drawings and to paste them onto the work-piece with Spraymount. This saves a lot of marking out and has to be accurate. After marking the boss centre deeply, it’s simply a matter of cutting out the two-bladed shape with the jig-saw or fret-saw set on slow. Even so, great care is needed in the tight curves around the boss area.
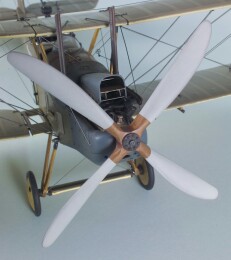
A four-blade airscrew requires two such roughed-out pieces, and I stress identical – any variations in geometry will stand out like a sore thumb. So check and adjust before the next stage, which is to scarf the two pieces together into a cruciform shape using a simple half-lap join. Next clean up the front and back surfaces with fine abrasive paper on a flat surface.
The next stage involves profiling each blade as seen from the side view, and here again I resort to pasted-on paper patterns. But first I fish around for a couple of brass or steel washers exactly boss diameter (or turn them on the lathe), which I tack to the work-piece front and back with sparing dabs of Superglue. Now there’s something positive to work to, because the metal acts as a guide when carving around the boss.
To a first approximation, which is really all I’m working to, the blades resolve themselves out of a corner-to-corner diagonal taken through the rough-cut shape, but do be careful here -- I’ve wasted more than one job by hacking away at the wrong corner! One difficulty is the aerofoil section, which tends to be flat or slightly concave on the ‘underside’ and convex on the topside --- just like an aircraft’s wing; after all, an airscrew’s thrust is only ‘lift’ in a forward direction.
I start by carving and sanding the flat side first, working from the boss outwards. With care, the shape starts to take care of itself – but on no account encroach over those corners because they delineate the leading and trailing edges of the blade! I take it slowly and cautiously and study the drawings and photographs as I go. To paraphrase the late John Lee, that all-time master of the scratch builder’s art – just carve away everything that doesn’t look like a propeller!
A rat-tail file is handy when dressing-out the curves around the boss. I found that no matter how careful I was with the initial jig-sawing, it was only the washers that enabled me to get the shape. Sometimes I cut too deeply, but this is rectifiable by pressing sawdust into the cavity between the washers and dropping on a tear or two of very runny Superglue. You may need to repeat the process, but it is hardly noticeable when filed back to shape and cleaned up.
Some propellers have a slightly raised boss, which at my skill level would be impossible to carve. My solution here is to chuck a stub mandrel in the lathe and Superglue a small square of matching wood to the end. This is turned to diameter, and a washer thin sliver parted off. After final cleaning up with wet and dry paper or fine sandpaper this can be glued into position, and the hole popped through.
I use the finest grade of steel wool for the final smoothing before applying a coat of diluted varnish using a good quality flat sable brush. Three of four or five coats are needed to give a glassy finish. I end with a cocktail of gloss and satin, since gloss alone always looks too shiny.
I use photo-etch brass for boss plates, because a company in the USA thoughtfully produces a selection of these in 1/24th scale. I have a stock of tiny brass nuts in 14 and 16 BA, and I use one of these for the big central locking nut, in combination with minute plastic bolt heads, the kind you can get on a sprue, to create the ring of bolt heads that encircle it.
By the time I had finished the airscrew of my RE8, I was so pleased with the beautiful wood creation that I had to force myself to mask off the central area and spray on coat of Humbrol light grey to represent doped fabric. The final touch involved dusting with mid grey pastel to take the newness off, and very delicate dry brushing of the boss plate.
I’ve stressed throughout this piece that my objective has been to carve airscrews in 1/24th scale that, to a first approximation, past muster. Shortly I’ll be attempting to re-produce the contours of a four-blade Hamilton Standard for my P51D. At 1/5th scale, which is far less forgiving, I have challenges still to master!