Warpaint - the first coats
Friday, 26th August, 2011
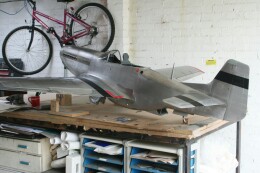
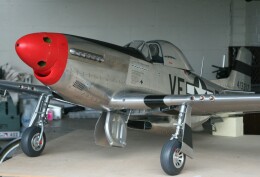
Painting has been the ruin of many an otherwise respectable model, and it is a job I fear. Even done well, it can mask fine detail. So with this in mind, I chose to adapt the striking yet ‘minimalist’ colour scheme of 336 Fighter Squadron’s celebrated pilot, Donald Emerson – as represented by Robert Tullius’ beautifully restored P51-D in the Royal Air Force Museum. Emerson was shot down and killed on Christmas Day 1944 during the Battle of the Bulge.
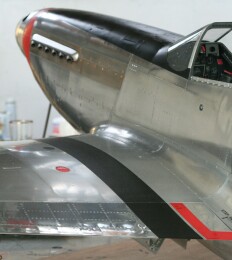
I stress ‘adapt’, because for the reasons given above I elected not to paint the wings and fuselage underside in the silver grey of the Hendon machine, and to omit the black and white under-wing and belly stripes. I am debating whether to include the Donald Duck nose art, which is beautifully although inaccurately represented on the Tullius restoration, and I still have doubts if the black anti-glare panel is accurate. According to author and aviation historian Dana Bell – a recognised authority in the US on the P51-D – this would most likely have been either olive drab or deep dull green. The rather grainy black and white photographs of Emerson’s aircraft that I have seen are inconclusive. Perhaps someone could advise. So the best I can claim is that I am finishing my model after the Hendon museum example, but with significant omissions!
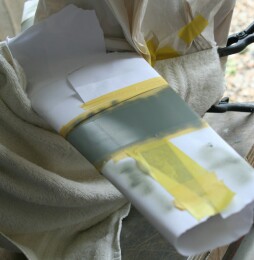
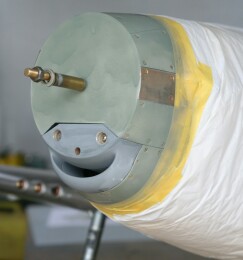
The first thing to say about the painting is that it was to be done on a highly polished aluminium alloy surface, so any notion of dispensing with acid etch primer could be discounted. I sought advice from Phoenix Precision Paints, specialist suppliers to model engineers, and more especially builders of small steam locomotives. My other requirement would be a set of bespoke laser-cut masks for the codes, serial numbers and stars and bars, but more of that later. Up to the time of writing, I am using a small Aztec dual-action airbrush, a superb tool but woefully undersized for the task. I have managed with it with difficulty, and really should have invested in something bigger, particularly for the two-part acid etch, which it did not like at all! (I now have a story about acid etch overspray and my wife’s brand new Audi TT Roadster, but it’s one that’s perhaps best left untold!)
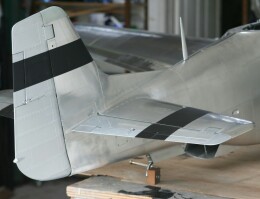
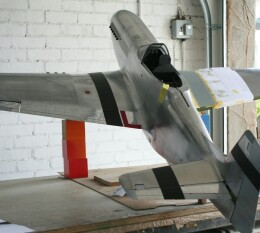
I started by masking and etching the black bars on the fin and tail plane followed (after 24 hours for the etch to take) by a couple of light coats of coat of Precision Paints’ dull (semi-matt) black. The fabric covered rudder, which I had already sprayed silver grey, needed no etch primer, but I was concerned about possible paint creep from around the rib tapes. I needn’t have worried: Being thin, soft and pliable, Tamiya masking tape beds down well. The biggest headache when I turned to the black wing bars was manhandling the bulky and by now heavy airframe. (It takes two of us, Eva and I, to turn the model over safely, and every time we do it my heart is in my mouth).
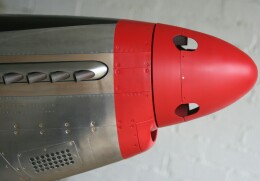
From start to finish with the exterior painting of this model I broke my own golden rule, which is always to ‘tone down’ pure black with a little white. The result to my eye was that the black appeared just a little too strident against the aircraft’s polished bare metal skin, as if they were sitting on it rather than of it. The solution was some careful polishing with a little T-Cut and finest grade Scotch-Brite. This seemingly severe treatment could have gone badly wrong, but done carefully it brought the black to life, imparting both a subtle, unifying sheen and restoring the rivet detail quite remarkably.
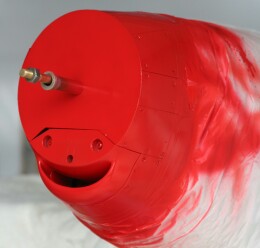
Not much more to say about these early stages of the painting, except that masking perfectly strait fore-aft lines over and around airfoil surfaces is less straightforward than it sounds. I found it particularly challenging to get the line of the anti glare panel straight when viewed side on. In fact, I believe this is almost impossible to do by eye. After several failed attempts to reconcile linearity with compound curvature, I resorted to contouring a piece of three-ply to fit the top cowlings and used this as a guide. Masking the aircraft’s red nose also caused problems, which I resolved rather clumsily with another off-cut of three-ply drilled for the prop shaft and clamped over the nose normal to the thrust line. By using a small block of hardwood cut to the exact thickness of the red band, I was able to mark a faint line around the entire circumference of the nose to act as a guide for my masking tape. There must be better tricks of the trade here. I wish I knew them.
Previous post

Cockpit update
Next post

Stars and bars

