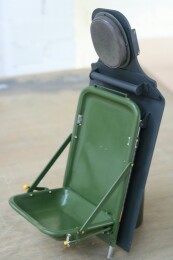
The pilot's seat
Sunday, 6th May, 2012
During an exceptionally cold, wet April of 2012, I resolved to tackle the pilot’s seat, a job I had toyed with and repeatedly put off over several years, simply for the lack of a clear idea how to make it or what to make it from.
My biggest problem was the seat pan, which, despite its stark simplicity, is a rather tricky shape. Ideally, I wanted to make the whole lot from brass, as I did my Spitfire seat, but I seriously doubted my ‘panel beating’ abilities. Aluminium might be easier, but how to solder it? I even contemplated using styrene sheet and vac-forming the thing! In the end I devised a technique that was new to me.
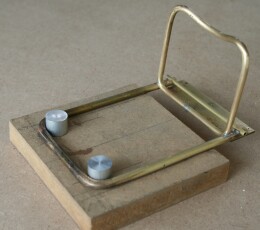
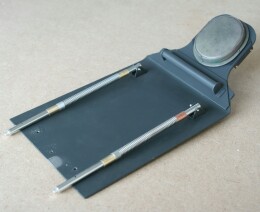
But first the frame: I used solid brass rather that tube, only because I have no bending machine (and weight is not a consideration). I began by making a simple jig, as shown by my photograph. Brass of this diameter bends relatively easily if annealed to a cherry red and quenched, but it was still a struggle, and rather hit-and-miss. But in the end I managed to coax two lengths of brass rod into the required shapes, and soldered them using high temperature soft solder (with allows for subsequent soldering operations). The photograph of the assembly on its jig illustrates this stage well enough, including a sheet brass element that really has no business to be there… more of that later.
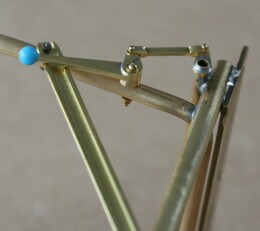
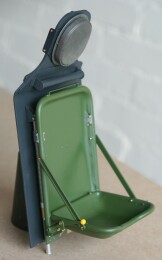
Because the Warren McArthur seat was sub-contracted by NAA, I have no working drawings, except a GA of a version substantially different from the one I was trying to build. However, the seat is shown in several excellent ‘exploded’ drawings in the P51-D Parts Manual. These were my salvation, because even without dimensions the draughtsmanship is concise, and I was able to ‘scale-off’ the items I needed. It is worth acknowledging here and now that I unashamedly omitted all those parts that do not show with the seat installed. Essentially, this left the belt and lift lock handle assemblies, which I made up in brass as shown in the photographs. In the full-size version, the two side supports for the seat pan are formed out of sheet metal, folded down their edges to achieve rigidity. I envisaged problems doing this, so I compromised by milling a linear channel into 3/32 sheet brass blanks. It looks fine when painted, but I could have saved myself the trouble, because with the seat installed, this feature is all but totally hidden from view. With the fine detail done and dry fitted, it was time to tackle the tricky bit.
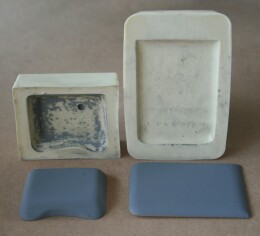
After much thought, I discarded the brass option in favour of my old favourite, litho plate, placing my faith in Superglue to do the work of solder! I began by making basswood patterns of the seat pan and back, exactly as if I were intending to vac-form them (my fall-back plan). With the patterns smoothed and primed, I suspended them, contoured-side downwards, in suitably containers, and poured two-part resin exactly to the level of the flats, thereby creating robust female moulds. But would I be able to force softened litho-plate down into them? Well, yes, and I think my photos speak for themselves. Admittedly, the process left a slight wrinkle or two here and there, but this added to rather than detract from the effect. And the Superglue? More than adequate on unstressed joints! I simply tacked the litho plate parts in exact position, then ran glue into the V shape created by the tubular frames, hardening it with accelerator as I progressed. With the raw edges tamped over with a tiny hammer, and ‘weld seams’ simulated with more Superglue, I managed to achieve a creditable result relatively easily. More to reinforce the soft, easily damaged aluminium than the bond, I took the precaution of coating the reverse sides of the seat pan and seat back with a generous layer of epoxy resin.
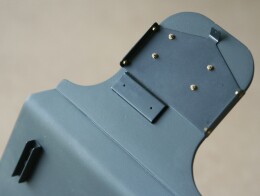
Originally, I had intended to mount the seat on its two spring loaded tubular supports, more or less as in the original, yet it became apparent as the job proceeded that this would require some very precise engineering that might prove not only unnecessary but ‘a bridge too far’. Hence the flat brass plate referred to above. Using this compromise I was able to bolt the seat directly but discretely to the armour plate, adding dummy stanchion clips (the prominent features bolted either side of the seat frame) at the conclusion of the job.

Previous post

Control column assembly
Next post

Hamilton Standard airscrew

