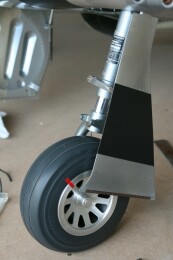
The Mustang's tyres
Thursday, 21st February, 2013
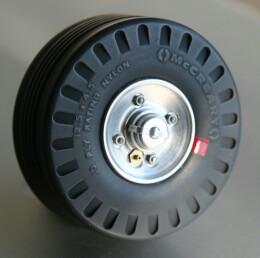
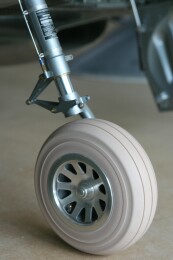
Producing the masters for the rubber tyres has been troublesome, not least because it is yet another job where I have had to feel my way. I was fortunate when I completed the Spitfire to find suitable commercial rubber tyres to fit, yet not so here. I also lacked drawings, but overcame this by measuring and taking numerous photographs of the real thing.
A bigger problem has been that of moulding. Several authors have described techniques for producing highly convincing rubber tyres for aircraft, yet these are lightweight and for flying models. With the considerable mass of my metal monster, nothing short of solid tyres will do, and from my research to date, largely among those masters of the craft of automobile modelling, this requires heat and pressure injection kit which is not something I have; moreover, the easier and feasible option of producing poured mouldings in two halves for later assembly, while appropriate for smooth tyres, is compromised by the need to preserve a tread pattern intact. As I write, I’m keeping my options open by producing not one but two master patterns for the main wheels which I can paint, weather and fit to the model in the interim, in the hope that I will find a solution at some later date. If anyone reading this can advise, I would be eternally grateful.
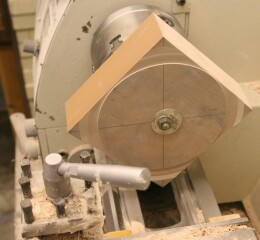
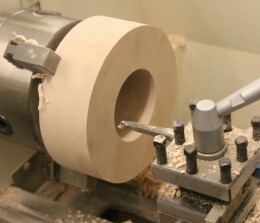
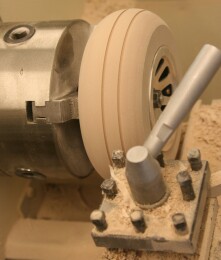
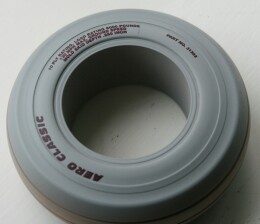
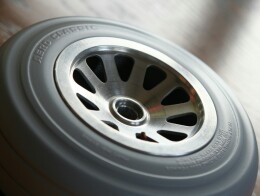
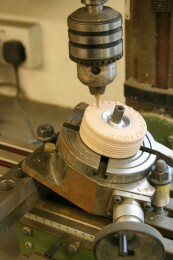
The obvious and ideal way to turn my patterns would have been to make a couple of hardened steel profile cutters. But I elected to cut corners and turn them largely ‘by eye’ to a template. However, I did fashion a simple concave steel cutter to impart the outside radius characteristic of the main gear tyres. It was chancy, more ‘sculpting’ than engineering, but I think I got away with it. P-51 tyres have numerous tread patterns, from rectangular to diamond-shape, and to keep faith with the Hendon machine, I should have attempted the latter. I hope I will not be judged too harshly for having taken the easiest realistic option, which I was able to copy in minutes with a narrow parting tool and careful use of my cross-slide’s metric scale. The accompanying photos show the turning in progress and also the beautiful finish obtained from high density model board. It’s expensive but well worthwhile to keep in stock, for it comes in handy for all sorts of jobs.
I hope the photographs describe the lathe work well enough. The eagle-eyed may note that the side walls of my tail wheel tyre have 24 little crenellations, against 30 in the real thing. This was unashamedly to make the maths easier when it came to using the rotary table, and also because it was a good compromise against my available stock of tiny end mill cutters.
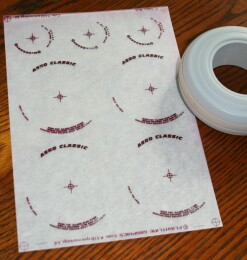
I would like to acknowledge here the invaluable help provided by Nigel Wagstaff of Flightline Graphics. Nigel both suggested multiple-layer rubdowns as a means to create the relief data on the side walls and indulged me during the experimentation required to see if the process would be viable. The use of conventional Letraset to do this job is not new; but as far as I know Nigel’s technique is, and I would content that given the minute letters involved, even at one-fifth scale, building up numerous layers of Letraset ‘by eye’ would be extremely taxing even for the largest characters and probably impossible for the smallest. Instead, these custom rubdowns, comprising six individual layers of ink, were relatively easy to apply. I ‘dusted’ them with a hair dryer turned down low to aid the transfer process, and I found that adhesion was aided by very carefully rolling the carrier sheet back like a carpet. Once the applied set had been boned down beneath the non-stick backing sheet adhesion of even the smallest characters was fine, and further consolidated by two or three overcoats of automotive primer.

Previous post

Canopy framework
Next post

An end in sight

