Retrospective: Fuselage frames
Tuesday, 2nd July, 2013
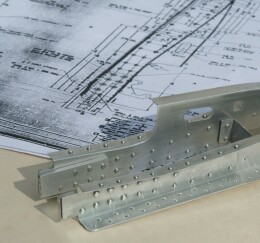
Way back at the conception of this project, I sourced a number of P-51D manufacturing drawings from the Smithsonian in Washington DC. Among them were various sheets catalogued as ‘fuselage frames’. In my almost total ignorance during those early days of the internal structure of the airframe, I was expecting something that – as in the Spitfire – would substantially reflect the immediate fuselage cross section and that, as such, would help me establish, or at least check, the fundamental three dimensional shape as delineated in three-view. Not so! The Mustang’s fuselage frames could hardly differ more from those of the Spitfire, rendering that element of my rather costly exploratory investment in paperwork useless to me during the initial stages of the project.
As things turned out (and as I have described elsewhere in this ‘blog’) I used Arthur Bentley’s fuselage cross sections to inform the basic structure, which I built in plywood and balsa, leaving what in the region of the cockpit area was virtually a shell. Only when this was complete with its four structurally fundamental longerons and metal skinned internally was there call for me to refer back to my drawings of the frames, and by that time I had acquired the entire NAA factory drawings set on DVD!
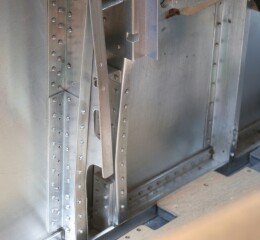
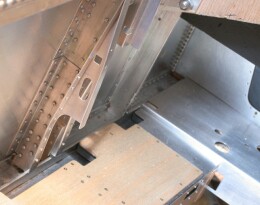
I include this short retrospective to illustrate how I built and installed those fuselage frames visible within the cockpit area of my model.
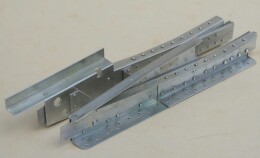
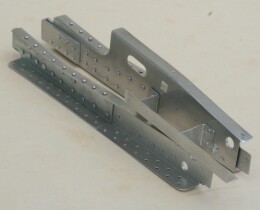
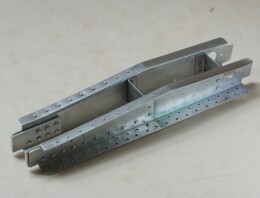
The overwhelming advantage of having the NAA drawings in digital format is that they can be sized to exact scale on the computer and printed out. Nowhere was this more helpful than in fabricating the frames, each one of which differs substantively from its neighbour. I will leave much of the narrative here to my photographs, which show well how the respective components of each frame were cut from litho plate using the scaled down drawings and riveted together mechanically with 1/16-in. snap head alloy rivets – a precise and painstaking undertaking.
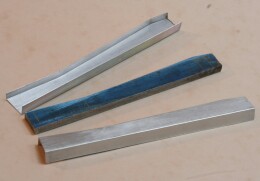
However, before anything could be riveted, I needed to produce the main structural component of each frame, which in the full-sized aircraft is essentially a matched pair of tooled channel-section pressings boxed together by spacers. So I began by cutting out a solid metal pattern from aluminium alloy plate around which I could form this three-dimensional shape. In each case I made the thickness of the former to the exact internal depth of the flanges. In that way, and after the bending was complete, the sides could be filed to depth using the in-situ pattern as a guide.
Prior to fitting each frame, I pre-drilled the numerous holes in the flanges, taking their locations directly from the drawing. Each frame is secured to inside skin by cyanoacrylate glue reinforced by the many tiny snap head rivets, each cut to less than 1/8-in long and impressed, with a minute blob of glue, into push fit holes in the fuselage sides. The result was a solid and durable job, and the full complement of installed frames added considerably to the model’s structural strength around the cockpit area.
-
Previous post

Retrospective: Tail wheel strut
-
Next post

Retrospective: Rudder pedals

